Free vs Pro
The current Free edition keeps your most recent 2 screenshots available in the app and Ghost Tray. Pro expands those limits and unlocks additional convenience tools including live capture mode, one-click blur, and inverse blur.
Install Snipper
Download SnipperSetup-v1.0.8.exe from the download page and run the installer.
Verified signed installer
Snipper is signed with a verified OV code-signing certificate issued by Certum to Aruna Aasirvatham. Free and Pro both use this same signed installer. A SmartScreen prompt does not mean Snipper is suspicious; it usually means Windows has not yet built enough download reputation for a newly published installer.
⚠ You may still see a caution prompt on a very new download or first run
Chrome, Edge, Explorer, SmartScreen, and some managed Windows setups may still show a caution prompt on a very new installer until reputation catches up.
Step 1 - In Chrome or Edge:
The download bar may show “SnipperSetup.exe is not commonly downloaded.” or a similar reputation warning.
Click the arrow (⌄) next to the filename → Keep → Keep anyway.

What you'll see in Chrome: click “Download suspicious file” to proceed.
Step 2 - When running the installer:
Windows may show “Windows protected your PC.” on a fresh build even when the installer is correctly signed.
Click More info → Run anyway.
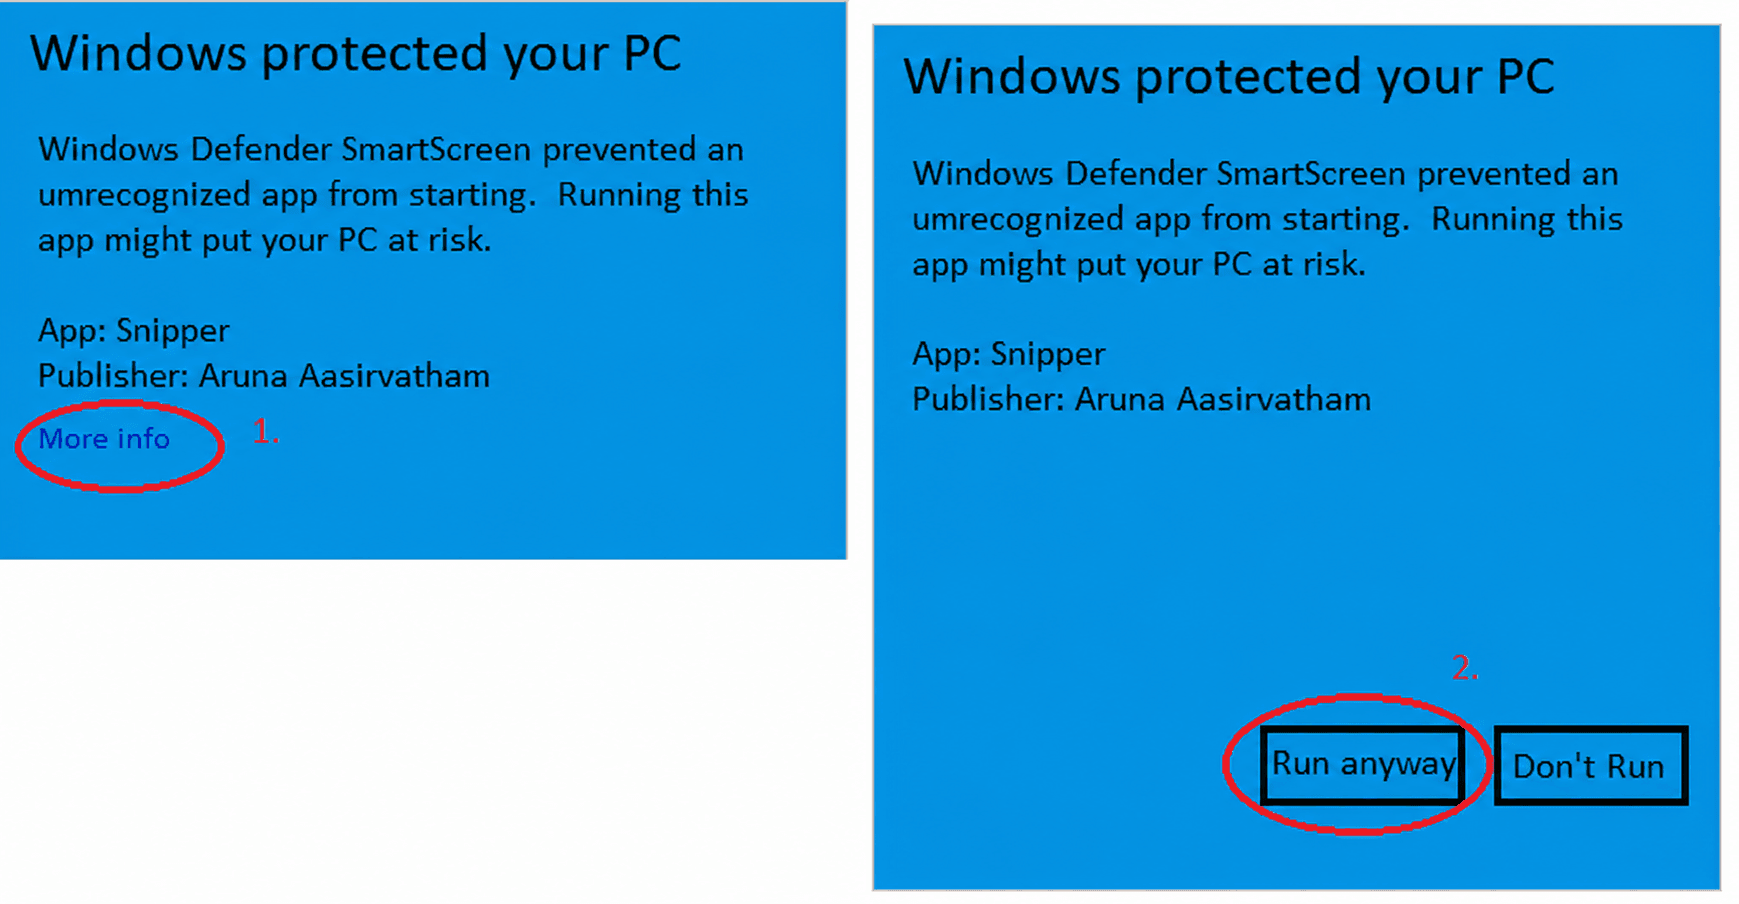
If this appears, choose More info, confirm the publisher, then choose Run anyway.
Step 3 - If there is no “Run anyway” option:
Sometimes SmartScreen shows only Don't run with no Run anyway button. This is caused by the mark of the web, a hidden tag Windows adds to any file downloaded from the internet. You can clear it on your own machine:
Option A - File Properties (no command line needed):
- Right-click SnipperSetup-v1.0.8.exe in your Downloads folder.
- Click Properties.

Steps 1-2: right-click the installer, then choose Properties.
- On the General tab, tick Unblock (next to the security note near the bottom).
- Click Apply.
- Click OK to close the dialog.

Steps 3-5: tick Unblock, click Apply, then OK.
Now double-click SnipperSetup-v1.0.8.exe to run the installer again.
No Unblockcheckbox? Then the file isn't blocked - just run it.
Option B - PowerShell: run the command below (adjust the path to where you saved the file):
Unblock-File -Path "$HOME\Downloads\SnipperSetup-v1.0.8.exe"This only removes the internet-download tag. It does not modify Snipper, which stays signed with the same verified certificate.
Step 4 - If Windows Smart App Control blocks it:
On some Windows 11 machines, Smart App Control is stricter than SmartScreen and may still block a newly released installer with no Run anyway option, even after code signing.
Open Windows Security → App & browser control → Smart App Control and check whether it is enabled on that machine.
If Smart App Control is the blocker, you will need to complete install on a machine where it is not enforced, or ask your workplace IT team to allow the signed Snipper installer. Smart App Control does not behave like SmartScreen and may not offer a per-app bypass prompt.
One upgrade note: installing a new version over an existing one creates a fresh uninstaller, and Smart App Control can treat that new file as unknown until it builds reputation, even though the previous version installed fine. If an in-place upgrade is blocked, uninstall the old version first and then install the new one.
After installation, Snipper starts minimised to the system tray.
Start free or unlock Pro
Free works immediately after install. No account is required.
If you bought Pro, open the upgrade prompt, toolbar entry, or Settings inside the app, paste the license key from your email, and activate.
The key is valid on up to 2 devices. Your screenshots and edits stay on your device. The app only connects when validating the license key.
Take your first screenshot
Press your configured capture hotkey anywhere. The screen freezes and dims. Draw a rectangle to capture. New installs default to Ctrl+Shift+4.
Open Settings to choose a different global capture hotkey. The shortcut is fully configurable and does not require reinstalling Snipper.
Free uses the frozen overlay. Live capture mode for moving UI and video is part of Pro.
The screenshot lands in the sidebar and the unedited capture is copied to your clipboard immediately, ready to paste with Ctrl+V.
Capture modes
Snipper supports three capture modes, selectable from the toolbar:
- Region - draw any rectangle across one or multiple monitors
- Window - click any window to capture it cleanly (no shadows)
- Fullscreen - captures the entire virtual desktop
Annotate your screenshot
Select a screenshot from the sidebar to open it in the main preview.
- Text tool - click anywhere on the image to place a text label. Drag to move it.
- Blur tool - draw a rectangle over sensitive info to blur it, then drag the blur block if you need to reposition it.
- Shape tools - once a shape tool is active, each click or drag places another shape until you press Esc to release it.
- Release any active annotation tool - press Esc when you are done with blur, text, or shapes.
- Move annotations - text, blur, shapes, and arrows can all be repositioned after placement.
- Undo (Ctrl+Z) - remove the last annotation.
Annotations are baked into the image when you copy or save.
Save or copy
New captures are copied automatically before you edit them, so the fastest path is often just capture then paste with Ctrl+V.
From the top toolbar:
- Copy (Ctrl+C) - copies the flattened edited image to clipboard (PNG + DIB format for max app compatibility)
- Save (Ctrl+S) - opens a save dialog. Default filename matches the screenshot name (S1.png, S2.png…)
- Auto-save - enable in Settings to automatically save every capture to your Pictures\Snipper folder
Drag screenshots into other apps
Snipper screenshots can be dragged straight into other interfaces such as Figma, Discord, Slack, email clients, and Explorer.
- Drag a single screenshot from the app sidebar or Ghost Tray to drop it into another app
- Drag multiple selected screenshots together from the app sidebar when you want to move a batch
- Use Drag All in Ghost Tray to move every currently available screenshot at once
- Free keeps your latest 2 screenshots available in Ghost Tray. Pro expands that to 5
Import existing images
You can bring existing image files into Snipper without using the file picker.
- Drag PNG, JPG, JPEG, or BMP files into Ghost Tray to add them as new screenshots
- Drag image files into the main app view to import them into the current session
- You can also use Open File... from the app menu if you prefer a standard picker
Settings
Open Settings from the toolbar or tray icon. You can configure:
- Hotkey - change the global capture shortcut
- Save folder - set a custom default save location
- Auto-copy to clipboard - toggle on/off
- Auto-save to Pictures - toggle on/off
- Theme - light or dark mode
Keyboard Shortcuts
| Shortcut | Action |
|---|---|
| Configurable | Take a screenshot. Set your capture hotkey in Settings (new installs default to Ctrl+Shift+4) |
| Esc | Cancel capture, close dialogs, or release the active annotation tool |
| Ctrl+Z | Undo last annotation |
| Ctrl+C | Copy current screenshot to clipboard |
| Ctrl+S | Save current screenshot to file |
| Delete | Delete selected annotation |
Troubleshooting
The hotkey doesn't work▾
Another app may be using the same shortcut. Open Settings and reassign the Snipper capture hotkey to a combination that fits your workflow. New installs default to Ctrl+Shift+4. No reinstall is needed.
SmartScreen or Smart App Control blocks the installer▾
Snipper is signed with a verified OV code-signing certificate issued by Certum to Aruna Aasirvatham. A SmartScreen warning does not mean Snipper is suspicious; it usually means Windows has not yet built enough download reputation for a newly published installer. If you see SmartScreen, click "More info", confirm the publisher, then click "Run anyway". Chrome or Edge may also require "Keep" or "Keep anyway" before the installer is available locally. If there is no "Run anyway" button, right-click SnipperSetup-v1.0.8.exe -> Properties, tick "Unblock" near the bottom of the General tab, click Apply and OK, then run it again (or run Unblock-File -Path "<path>\SnipperSetup-v1.0.8.exe" in PowerShell). This only clears the internet-download tag and does not modify the signed installer. If Windows 11 Smart App Control is the blocker, it may not provide a per-app bypass prompt, so check Windows Security -> App & browser control -> Smart App Control and complete install on a machine where it is not enforced, or ask IT to allow the signed installer.
Screenshots are blurry or offset on high-DPI screens▾
Snipper supports 100% to 150% DPI scaling. If you're running above 150% or have mixed-DPI monitors, email snipperapphq@gmail.com and include screenshots of the issue so we can reproduce it properly.
Ghost Tray disappeared▾
Open Snipper again from the system tray using Show. The Ghost Tray normally reappears with the main app. If it still does not come back, restart Snipper and email snipperapphq@gmail.com with screenshots of what you are seeing.